Welcome to my new blog home. It’s fitting that this first post at my new address should be about a project that has moved from being an unfinished object to a work in progress (a bit like this new site).
In March last year, I decided I wanted to learn how to make Attic Window blocks — I was intrigued by the so-called “Y-seam”. It took several weeks before I became even remotely confident with the technique.
I started without a plan for a quilt in mind (I just wanted to practise the technique) but quickly realised that attic window blocks made interesting pin-wheels, so I began making four blocks with the same dark fabric but using different fabrics for the window pane and the lighter frame (scrap quilting is what I do).
Each pin-wheel, of course, takes four blocks. I have looked on my (old) blog and I don’t have any posts about these blocks — which is a shame; when I pulled the project from the UFO pile last week, I already had 32 blocks made. I told you it took a while for me to become confident with the technique!
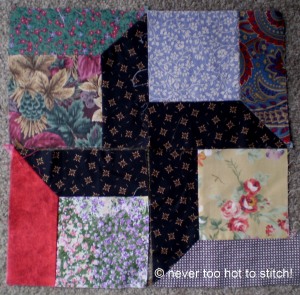
Some of the blocks don’t work as well as they might — the fabrics I have chosen tend to blur part of the pin-wheel because the window pane is a similar tone to the pin-wheel ‘arm’. Look at the block on the bottom left in the photo below, the batik used on the window pane is too similar to the arm of the pin-wheel. The paisley print in the left top block is not much better!
Two of the blocks, perhaps two of my originals, would make the pin-wheel spin the wrong way so they have been relegated to the back of the quilt to be part of my signature block panel. Therefore, before I could go any further, I needed four more blocks; two for the back, and two to replace the odd-bods! I made the four ‘replacement’ blocks on Wednesday but it had been so long since I had visited the technique that only one of the four went well (the first one!).
Now I had 32 blocks for the front of the quilt and four blocks for the back. Each pin-wheel is 12″ square (finished) A quick calculation showed that and I would therefore need 20 pin-wheels, or eighty blocks, for the front and four pin-wheels for the back.
January is blue month over at the 2016 Rainbow Scrap Challenge so I pulled my blue scraps to make some more pin-wheels. I cut enough fabric for five more pin-wheels but I didn’t feel confident to go ahead. Hurrah for YouTube and the wonderful people who share their tutorials there for free! On Wednesday night, after WM and Mum had gone to bed, I watched a fantastically helpful video called “Mitred Corners in Attic Windows or Borders“. I tried using their technique on four blocks and it worked perfectly! Hurrah! Thank you, Ruth’s Stitchery! (I’d embed it here but I don’t think WordPress allows videos on their free site — at least, I can’t find a way to make it work! So, I’ve added the link so you can check the video for yourself if you’re interested).
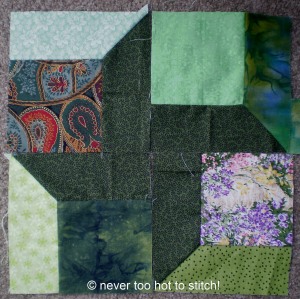
On Thursday and Friday I churned out a total of twenty more blocks! My latest blocks are stacked in sets of four; there are actually twenty blocks here, not five: I don’t have a design wall top take photos of that many blocks at once!


This post is linked to the latest post for the Rainbow Scrap Challenge over at SoScrappy blog. Why not pop over there and see what others have been doing with their blue scraps?
In the meantime, may your stitches bring you much joy.
Lynne

love them. I too am trying to give UFOs some new life. my attic window for the deer is a “cheater”. I made a corner on one end by putting a fabric square and sewing on the diagonal. worked for me!
LikeLike
My very first comment and the blog is only a couple of hours old! Welcome and thank you!
Yes, I’ve heard there are ways to cheat, such as using a half square triangle in the corner, but I wanted to master the Y-seam technique!
LikeLike
Love your new home. The pinwheel blocks you created are so great. Actually, adding in those few that are not distinct and seem to blur just add interest to the overall design. Standing alone you see the problem, but thown into the mix it just blends in and works.
LikeLike
Thanks — I’m still trying to find my way around. Not sure what I can and can’t do yet.
What you say about adding the less distinct pinwheels makes sense. Since writing that post, I’ve decided to use only blue blocks — I had more than half of them blue so it made sense to just make the rest blue too!
LikeLike
Nice blog change! I hope it wasn’t too painful! These blocks are very interesting to make but excellent put together!
RSC is a lovely idea; thanks for pointing me that way!
LikeLike
Not painful at all since I already had an account here. Blogger wouldn’t allow me to upload photos and I needed to post right away, so I just gave up and moved — a spur of the moment decision that has been a long time coming, a bit like an “overnight success” that takes years to happen!
Making the blocks is so much easier since I learnt to put the dot on the back of the pane, not on the strips — makes a lot more sense too!
I’ve been participating in RSC since late 2011, with the exception of last year; it’s great fun seeing what others do with their scraps.
LikeLike
Interesting Attic Windows arrangement. You gotta love a good Pinwheel block!!
LikeLike
Yeah! I don’t have enough feature-type scraps so it was the best way forward in using my practice blocks in a practical way!
LikeLike
Hey Lynne, another great project in the works. Scraps always look awesome, but I can see why you rejected that one – not quite enough contrast. Thanks for letting me know about your new blog home and nice to hear from you. You don’t have a button so I can follow though…. I understand that Blogger isn’t letting its customers follow non-blogger blogs anymore as well, so a button to follow by email would be good.
LikeLike
Hi Janet; I’ll try to find such a button and get it on the site as soon as possible. Thanks for alerting me to this!
LikeLike
What a wonderful idea! Your quilt is going to be beautiful.
LikeLike
Thank you! I just didn’t have the right fabrics to make the blocks work in a conventional way!
LikeLike
What a fun project! You certainly made good use of your blue scraps.
LikeLike